How to Build a PC for Beginners: The Ultimate Step-by-Step Guide
Building your own PC is often a hard task, but it's also incredibly rewarding. Not only you will have a machine that's able to fulfill your exact needs, but you’ll also gain a deep understanding of how computers work. Whether you’re aiming for a gaming powerhouse, a productivity machine, or a budget build, this guide will walk you through the process of assembling a PC from scratch.
Step 1: Preparing the Workspace and Tools
Now that you've got all your components, it’s time to get ready for assembly. You’ll want to make sure you have a clean, well-lit workspace with enough room to spread out your parts. A static-free environment is essential to avoid damaging components.
Tools you’ll need include:
- A Phillips head screwdriver (magnetic ones are a plus).
- Cable ties for cable management.
- Anti-static wristband (optional, but recommended for safety purpose).
Step 2: Installing the CPU
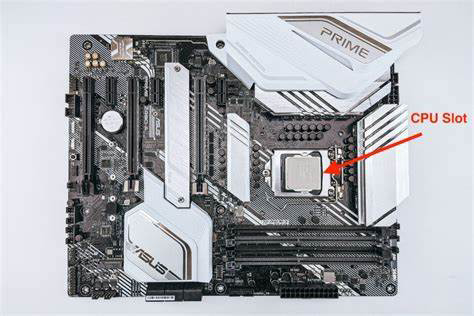
Before placing the motherboard into the case, start by installing the CPU. First, open the CPU socket on the motherboard by lifting the lever. Then, carefully align the CPU with the socket. The CPU will only fit in one orientation, so don’t force it. Gently lower the CPU into place and secure it by lowering the lever.
Step 3: Installing the RAM

Next, install the RAM modules. Find the RAM slots on the motherboard (usually next to the CPU socket). Open the clips on each side of the RAM slots, then align the notch on the RAM module with the slot. Gently press down until the RAM clicks into place and the clips lock in. Be sure to install the RAM in the recommended configuration (usually slots 1 and 3, or 2 and 4).
Step 4: Installing the CPU Cooler
If you have an air cooler, place the cooler on top of the CPU, making sure to align it with the mounting holes. Tighten it gently using the screws provided. Make sure the thermal paste (either pre-applied to the cooler or applied by you) makes good contact with the CPU to ensure optimal cooling.
If you're using a liquid cooler, you’ll need to mount the radiator to the case first. Make sure the pump unit is securely attached to the CPU.
Step 5: Installing the Motherboard into the Case
Now it’s time to mount the motherboard in the case. First, install the I/O shield (the metal plate that covers the ports on the back of the motherboard). Then, align the motherboard with the standoffs in the case, making sure the CPU and RAM are facing the correct direction. Secure the motherboard with screws.
Step 6: Installing the Storage Devices
Now you’ll install your SSD or HDD. Most cases will have dedicated slots for mounting storage devices. SSDs often go into 2.5-inch bays, while larger HDDs typically go into 3.5-inch bays. For NVMe SSDs, they will go into an M.2 slot on the motherboard. Secure the storage drives with screws or brackets, depending on your case design.
Step 7: Installing the Power Supply Unit (PSU)
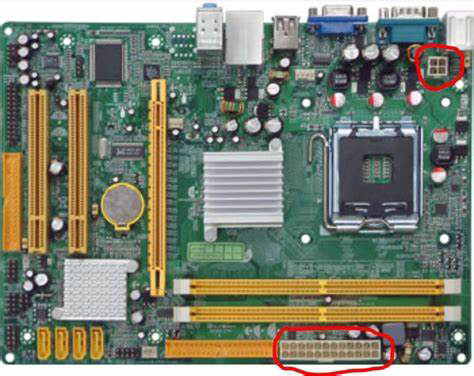
With the motherboard and storage in place, it’s time to install the power supply. Most cases have a dedicated PSU space at the bottom or top. Place the PSU into this space, making sure the fan is facing down (if bottom-mounted). Secure it with screws.
Next, connect the necessary power cables from the PSU to the motherboard, CPU, and GPU (if applicable). The 24-pin connector goes into the motherboard, while the 8-pin connector powers the CPU.
Step 8: Installing the Graphics Card (GPU)

The graphics card is a bit of a showstopper, and installing it is usually pretty straightforward. Slot the GPU into the PCIe x16 slot on the motherboard (it should click into place). Secure the card to the case with screws. Then, connect the necessary power cables from the PSU to the GPU.
Step 9: Cable Management
Now that all the components are in place, it's time to clean up the cables. Use cable ties or Velcro straps to bundle cables together neatly. Tidy cable management not only improves airflow but also makes your build look cleaner and more professional.
Step 10: Final Checks
Before you power on your new PC, make sure all your components are connected properly. Double-check that the motherboard’s 24-pin power connector, CPU power connector, GPU power connectors, and storage drives are all securely plugged in.
Step 11: Powering Up and Installing the Operating System
With everything in place, it’s time to power on your PC. When you press the power button, the fans should spin, and the motherboard lights should come on. If you see nothing on the monitor, don’t panic – double-check your connections, especially to the GPU and monitor.
Once your PC powers up, go into the BIOS by pressing a specific key (usually “Delete” or “F2”) during startup.

Here you can set up your boot order, enable XMP for faster RAM, and make sure all the components are recognized.
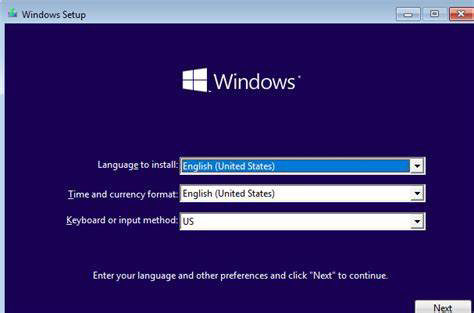
Next, insert your bootable USB drive with your operating system and follow the installation process. If you're installing Windows, you'll need to enter your license key during setup.
Step 12: Installing Drivers and Software
Once your operating system (example:
Windows:
Linux:

Is settled up and running, it’s time to install the necessary drivers for your hardware. Start with the chipset drivers for your motherboard, then move on to GPU drivers, sound card drivers, and any other peripherals you have.
Finally, install essential software like antivirus programs, productivity apps, and any other software you use regularly.
And BOOM! you just builded your own PC and saved money.


Comments
Post a Comment